1.06 Light Microscope
Introduction to Cell Biology
- Cell biology = the study of cells.
Types of Microscopes
- Light Microscope: Uses light radiation to create cell images.
- Electron Microscope: Uses electron radiation for higher resolution images (details discussed later).
Plant and animal cells
Figures: Images of actual human, plant cell and bacterial cells.
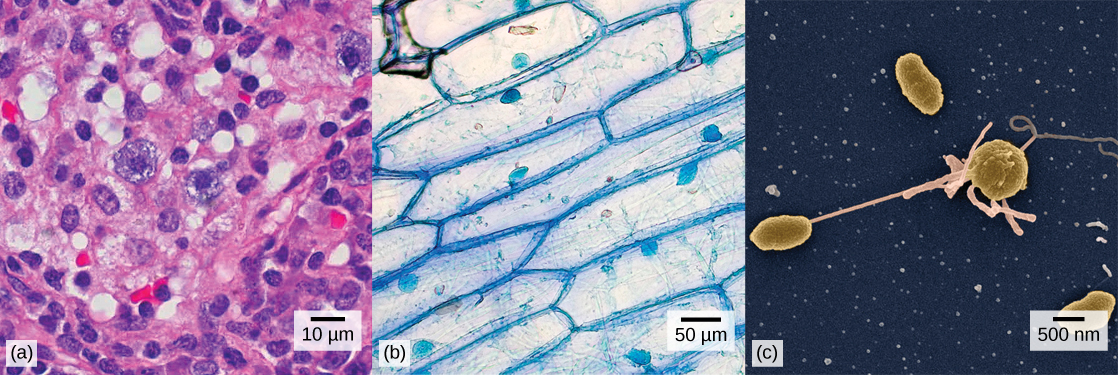
(a) Human nasal sinus cells (viewed with a light microscope), (b) onion cells (viewed with a light microscope), and (c) Vibrio tasmaniensis bacterial cells (seen through a scanning electron microscope).
Figures: Show generalized structures of animal and plant cells

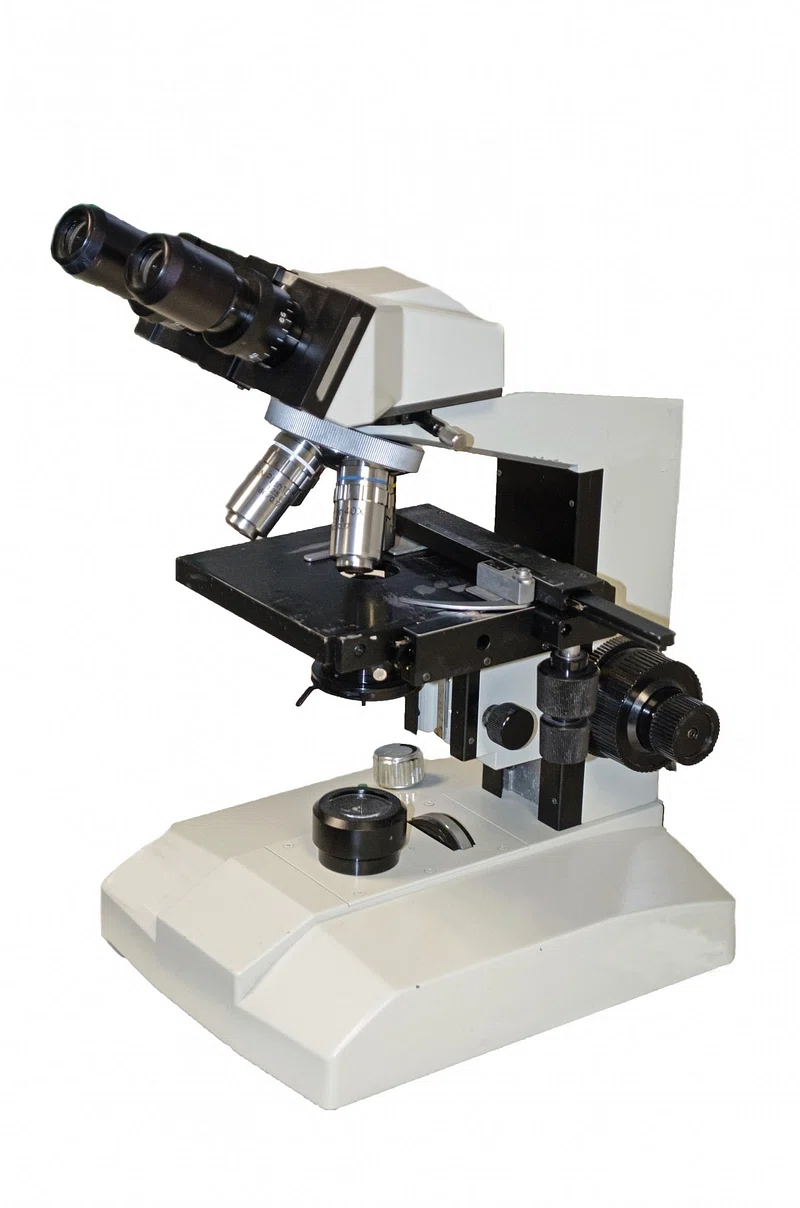
Compound Light Microscope
- Compound Light Microscope: Utilizes multiple lenses to magnify specimens up to 1000x. Ideal for viewing stained cells, tissues, and microorganisms.

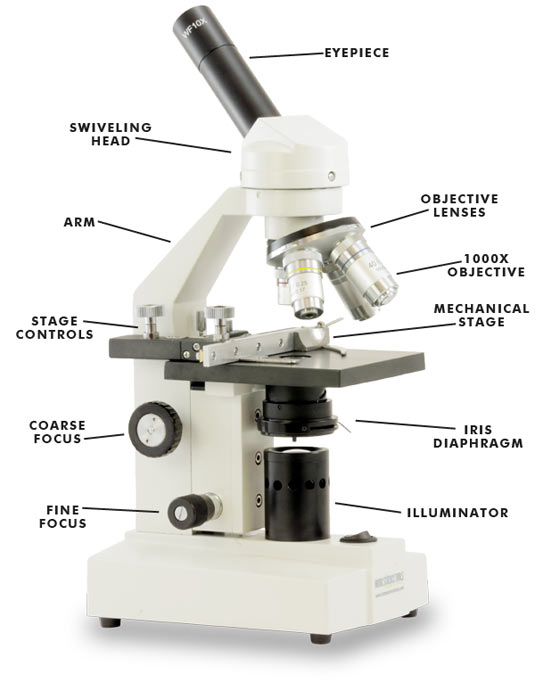
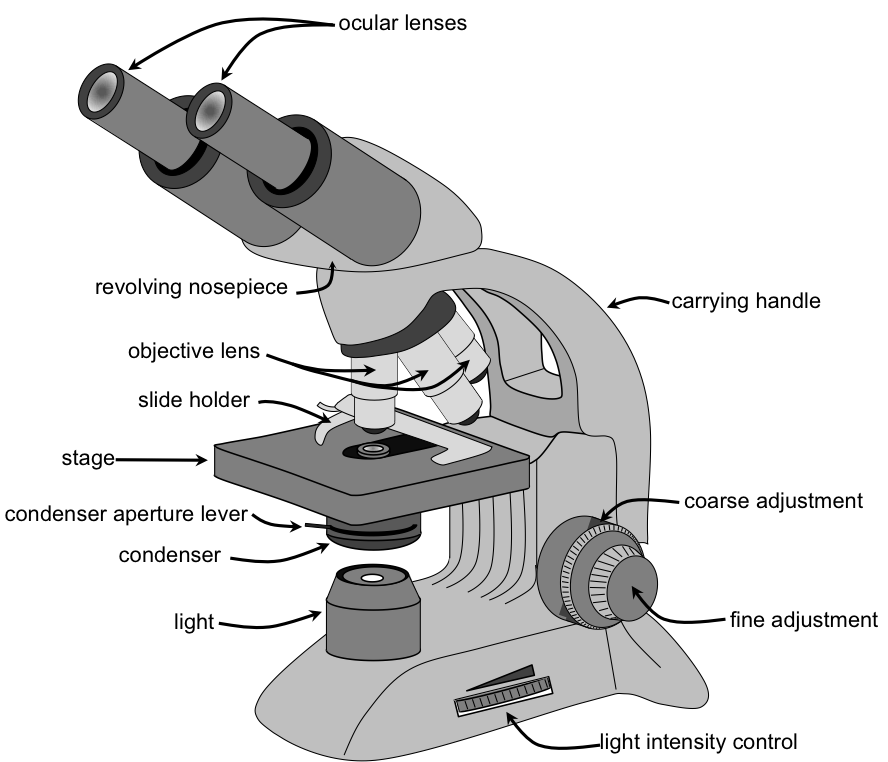
Parts of a Compound Light Microscope
- Eyepiece (Ocular Lens): Typically 10x magnification; the lens you look through.
- Objective Lenses: Usually three or four lenses (e.g., 4x, 10x, 40x, 100x). They provide primary magnification.
- Nosepiece (Turret): Holds the objective lenses and can be rotated to change magnification.
- Stage: Platform where the slide is placed.
- Stage Clips: Hold the slide in place.
- Condenser: Focuses light onto the specimen.
- Diaphragm (Iris or Disc Diaphragm): Controls the amount of light reaching the specimen.
- Coarse Focus Knob: Adjusts the focus quickly.
- Fine Focus Knob: Makes precise focus adjustments.
- Light Source (Illuminator): Provides the light needed to view the specimen.
- Base: The bottom support structure of the microscope.
Magnification and Resolution
- Total Magnification: Product of the magnification of the eyepiece and objective lens.
Example: 10x eyepiece × 40x objective = 400x total magnification. - Resolution: The ability to distinguish two close points as separate entities. Higher resolution allows for clearer and more detailed images. Factors affecting resolution include the wavelength of light and the numerical aperture of the objective lens.

Specimen Preparation
- Proper specimen preparation is crucial for clear and detailed observation.
- Choosing the Specimen:
- Select thin sections of plant tissues (e.g., lower epidermis of a leaf, onion peel) to allow light to pass through.
- Making the Specimen Thin:
- Thin slices ensure light penetration and prevent overlapping structures, which can obscure details.
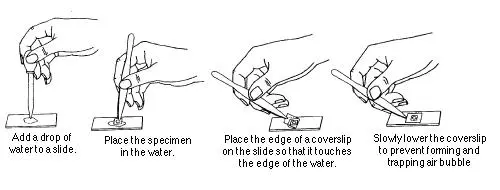
- Slide Preparation:
- Materials Needed: Clean microscope slides, cover slips, pipette or dropper, tweezers, scalpel or blade (if necessary), staining reagents.
- Steps:
- Clean the Slide: Ensure the slide is free from dust and debris to avoid image distortion.
- Add Water: Use a pipette to place a drop of distilled water in the center of the slide. Water acts as a medium to keep the specimen moist.
- Place the Specimen: Carefully place the prepared epidermal tissue into the drop of water.
- Flatten the Specimen: Gently press down with a tweezer or the back of a spatula to spread the tissue evenly.
- Apply the Cover Slip: Slowly lower a cover slip at an angle to avoid trapping air bubbles, which can interfere with viewing.
- Remove Excess Water: Blot the edges with a paper towel if necessary to prevent movement.
- Staining (Optional but Recommended):
- Purpose: Enhances contrast by coloring specific cell structures, making them easier to observe.
- Common Stains:
- Iodine Solution: Stains starch granules in cells.
- Methylene Blue: Stains nuclei and other cell components.
- Safranin: Stains cell walls and nuclei.
- Procedure:
- Apply a few drops of stain to the specimen on the slide.
- Let it sit for a minute or two.
- Gently rinse with water to remove excess stain.
- Reapply the cover slip if necessary.
Using the Microscope
- Initial Setup:
- Place the slide on the stage and secure it with stage clips.
- Connect and turn on the microscope’s light source.
- Focusing:
- Start with the Lowest Magnification (e.g., 4x):
- Rotate the nosepiece to the lowest objective lens.
- Use the coarse focus knob to bring the specimen into general focus.
- Use the fine focus knob to sharpen the image.
- Increasing Magnification:
- Once the specimen is clear at low magnification, switch to a higher objective lens (e.g., 10x, then 40x).
- Adjust focus with the fine focus knob as necessary.
- Avoid using the highest magnification (e.g., 100x) unless necessary, as it may require oil immersion techniques.
- Start with the Lowest Magnification (e.g., 4x):
- Adjusting Light and Contrast:
- Use the diaphragm to control the amount of light.
- Adjust the condenser to focus light on the specimen.
- Alter the light intensity for optimal visibility.
- Final Steps:
- Observe the specimen under different magnifications to examine various details.
- Take notes or sketches as needed for study purposes.
Safety Considerations
- Handling Microscope Components:
- Always carry the microscope with two hands to prevent drops.
- Keep the lens and stage clean using lens paper or appropriate cleaning solutions.
- Chemical Safety:
- Handle stains and reagents with care, using gloves and goggles as necessary.
- Dispose of chemical waste properly according to your institution’s guidelines.
- Electrical Safety:
- Ensure that the microscope’s electrical components are in good condition.
- Keep cords away from pathways to prevent tripping hazards.
Troubleshooting Common Issues
Confirm that the objective lenses are functioning correctly.
- Blurry Images:
- Ensure the specimen is properly focused.
- Check if the lenses are clean and free from smudges.
- Verify that the specimen is adequately prepared and thin.
- Uneven Illumination:
- Adjust the condenser and diaphragm to ensure even light distribution.
- Clean the light source and lenses to remove any obstructions.
- Air Bubbles Under Cover Slip:
- Carefully lower the cover slip at an angle to minimize trapping air.
- If bubbles form, remove and reposition the cover slip.
- Low Magnification Not Showing Details:
- Increase magnification stepwise, ensuring each step is properly focused.
Ultrastructure and Microscopy
Definition of Ultrastructure
Comparison with Light Microscopy
Practise Questions
1. Multiple Choice
Which type of microscope is best suited for viewing the internal structures of a cell at very high magnification?
A) Stereo Microscope
B) Compound Light Microscope
C) Transmission Electron Microscope (TEM)
D) Fluorescence Microscope
Answer: C) Transmission Electron Microscope (TEM)
2. Short Answer
Describe the primary difference between a light microscope and an electron microscope.
Answer:
A light microscope uses light radiation to create images of specimens and is typically used for viewing stained cells, tissues, and microorganisms at magnifications up to about 1000x. In contrast, an electron microscope uses electron radiation to achieve much higher resolution and magnification, allowing for detailed visualization of internal cell structures and surfaces at the nanometer scale.
3. Diagram-Based Question
Label the following parts on the compound light microscope diagram provided:
- Eyepiece (Ocular Lens)
- Objective Lens
- Nosepiece (Turret)
- Stage
- Condenser
- Diaphragm
- Coarse Focus Knob
- Fine Focus Knob
- Light Source
- Base
Answer:
4. Short Answer
Explain the purpose of staining in microscope specimen preparation and name two common stains used.
Answer:
Staining enhances the contrast of cell structures by adding color to specific components, making them easier to observe under a microscope. Two common stains are:
- Methylene Blue: Stains nuclei and other cell components, making them more visible.
- Safranin: Stains cell walls and nuclei, providing clear differentiation of structures.
5. Comparison
Compare the compound light microscope and the stereo microscope in terms of magnification and suitable applications.
Answer:
A compound light microscope utilizes multiple lenses to achieve high magnifications up to 1000x, making it ideal for viewing stained cells, tissues, and microorganisms. In contrast, a stereo microscope offers lower magnifications (10x to 40x) and provides a three-dimensional view, making it suitable for examining larger, solid specimens such as insects, plant parts, and small objects that do not require high magnification.
6. Application
You have prepared a thin slice of onion epidermal tissue and placed it on a microscope slide with a cover slip. Describe the steps you would take to observe the stained cells using a compound light microscope.
Answer:
- Clean the Slide: Ensure the slide is free from dust and debris.
- Add Water: Place a drop of distilled water in the center of the slide.
- Place the Specimen: Carefully add the prepared onion epidermal tissue to the water drop.
- Flatten the Specimen: Gently press down to spread the tissue evenly.
- Apply the Cover Slip: Lower the cover slip at an angle to avoid air bubbles.
- Stain the Specimen: Apply a few drops of stain (e.g., methylene blue), let sit, then gently rinse with water.
- Secure the Slide: Place the slide on the microscope stage and secure it with stage clips.
- Initial Focus: Start with the lowest magnification, use the coarse focus knob to bring the specimen into general focus, then use the fine focus knob to sharpen the image.
- Increase Magnification: Switch to higher objective lenses as needed for more detail.
- Adjust Light and Contrast: Use the diaphragm and condenser to optimize lighting for clear visibility.
7. True or False
True or False: A scanning electron microscope (SEM) provides detailed three-dimensional images of a specimen’s surface.
Answer:
True. A Scanning Electron Microscope (SEM) scans the specimen with a focused beam of electrons to create detailed three-dimensional images of its surface.
8. Short Answer
What is the role of the condenser in a compound light microscope?
Answer:
The condenser focuses light onto the specimen, directing and concentrating the light beam to illuminate the sample effectively, which enhances image clarity and resolution.
9. Explanation
Explain how total magnification is calculated in a compound light microscope and provide an example.
Answer:
Total magnification is calculated by multiplying the magnification power of the eyepiece (ocular lens) by the magnification power of the objective lens.
Example:
If the eyepiece has a magnification of 10x and the objective lens is 40x, the total magnification is:
Total Magnification = 10x × 40x = 400x
10. Question
Discuss the importance of proper specimen preparation and staining techniques in cell biology studies using light microscopy. Include potential issues that can arise from improper preparation.
Answer:
Proper specimen preparation and staining techniques are crucial in cell biology as they significantly enhance the visibility and contrast of cellular structures under a light microscope. Preparing thin sections of tissue ensures adequate light penetration and prevents overlapping of cells, allowing for clear observation of individual cells and their components. Staining selectively colors specific cell structures, such as nuclei and cell walls, making them stand out against the background and facilitating detailed study of cell morphology and organization.
Importance:
- Enhanced Contrast: Stains increase the contrast between different cell parts, making structures like nuclei, cytoplasm, and organelles more distinguishable.
- Identification of Structures: Specific stains can highlight particular components, aiding in the identification and analysis of cellular functions and anomalies.
- Documentation and Analysis: Clear, well-prepared specimens allow for accurate documentation through sketches or photographs, which are essential for further analysis and comparison.
Potential Issues from Improper Preparation:
- Damage to Specimen: Excessive pressure or improper handling during preparation can damage delicate cell structures, leading to inaccurate observations.
- Blurry Images: Inadequate focusing or improper specimen placement can lead to unclear images, hindering observation.
- Air Bubbles: Trapped air bubbles under the cover slip can obscure the view and distort structures.
- Overlapping Cells: Thick specimens can cause cells to overlap, making it difficult to distinguish individual cells and their components.
- Uneven Staining: Uneven application of stains can result in inconsistent coloring, making it challenging to identify structures accurately.