9.06 Practicals: Airways
Making Drawings of Prepared Slides – Tracheal Section
Purpose of Activity
- To practice and apply biological drawing skills by creating an accurate, detailed drawing of a tracheal section.
- To understand structural anatomy of the trachea, including cartilage, muscle, and tissue arrangement.
Preparation Steps
- Review Drawing Guidelines
- Read Practical in Chapter 7 for general biological drawing guidelines:
- Accurate representation: Draw exactly what is seen, with correct proportions.
- Clarity and labeling: Use neat, unshaded lines and clearly label structures.
- Scale and magnification: Include a scale bar if possible, and specify magnification level.
- Consult Practical Workbook
- Review Practical Investigations Chapter 7:
- These sections cover additional guidance on drawing techniques and specifics on tracheal histology.
- Ensure familiarity with cell types and structures typically visible in a tracheal section.
Instructions for Drawing the Tracheal Section
- Set Up Slide and Microscope
- Mount the tracheal slide and adjust the microscope to obtain a clear, magnified view (×4 magnification).
- Observe the orientation: Front of the neck is at the top of the section; back of the trachea is at the bottom.
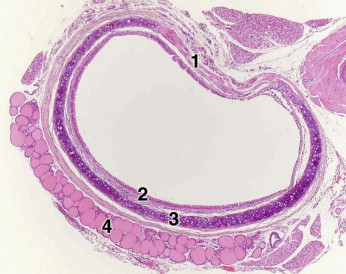
- Key Structures to Include in the Drawing
- Cartilage Rings:
- Identify the C-shaped rings of hyaline cartilage surrounding most of the trachea.
- The cartilage should be drawn as incomplete rings, with a gap at the back (posterior) of the trachea.
- Provide clear lines for cartilage edges and label as “Cartilage Rings”.
- Smooth Muscle Band:
- Draw and label the smooth muscle band located at the back of the trachea, filling the space between the ends of the cartilage rings.
- Label as “Smooth Muscle”; indicate that it serves to allow tracheal flexibility and diameter adjustment.
- Epithelium:
- Draw the inner lining of the trachea, noting the ciliated epithelium.
- This layer should be labeled as “Ciliated Epithelium” to highlight its role in moving mucus out of the respiratory tract.
- Connective Tissue:
- Identify and draw the connective tissue that lies between the cartilage rings and the epithelium.
- Label as “Connective Tissue” to indicate its structural and supportive function.
- Drawing Specifications
- Magnification: Clearly indicate that the drawing is at ×4 magnification.
- Orientation Labels:
- Mark the top of the drawing as the front of the neck.
- Mark the bottom as the back of the trachea.
- No shading: Use only outline lines to maintain clarity.
- Label Placement: Place labels neatly with horizontal lines pointing to each structure.
Additional Notes
- Scale Bar (Optional): Add a scale bar if possible, to indicate the approximate size of structures at ×4 magnification.
- Focus on Detail: Aim to capture any cell layers and structural differences observed, including varying thicknesses or textures.
- Accuracy and Proportion: Structures should be represented with correct relative sizes to aid in understanding functional anatomy.